Color Labeled Regions in Image#
Synopsis#
Color labeled regions in an image.
Results#
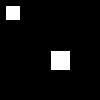
image.png#
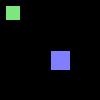
output.png#
Code#
C++#
#include "itkBinaryImageToLabelMapFilter.h"
#include "itkImage.h"
#include "itkImageFileWriter.h"
#include "itkImageRegionIterator.h"
#include "itkLabelMapToLabelImageFilter.h"
#include "itkLabelMapOverlayImageFilter.h"
#include "itkRGBPixel.h"

using ImageType = itk::Image<unsigned char, 2>;
static void
CreateImage(ImageType::Pointer image);

int
main()
{
  auto image = ImageType::New();
  CreateImage(image);

  using BinaryImageToLabelMapFilterType = itk::BinaryImageToLabelMapFilter<ImageType>;
  auto binaryImageToLabelMapFilter = BinaryImageToLabelMapFilterType::New();
  binaryImageToLabelMapFilter->SetInput(image);
  binaryImageToLabelMapFilter->Update();

  using RGBPixelType = itk::RGBPixel<unsigned char>;
  using RGBImageType = itk::Image<RGBPixelType>;

  using LabelMapOverlayImageFilterType =
    itk::LabelMapOverlayImageFilter<BinaryImageToLabelMapFilterType::OutputImageType, ImageType, RGBImageType>;
  auto labelMapOverlayImageFilter = LabelMapOverlayImageFilterType::New();
  labelMapOverlayImageFilter->SetInput(binaryImageToLabelMapFilter->GetOutput());
  labelMapOverlayImageFilter->SetFeatureImage(image);
  labelMapOverlayImageFilter->SetOpacity(.5);
  labelMapOverlayImageFilter->Update();

  itk::WriteImage(labelMapOverlayImageFilter->GetOutput(), "output.png");

  return EXIT_SUCCESS;
}

void
CreateImage(ImageType::Pointer image)
{
  // Create a black image with a white square
  ImageType::IndexType start;
  start.Fill(0);

  ImageType::SizeType size;
  size.Fill(100);

  ImageType::RegionType region;
  region.SetSize(size);
  region.SetIndex(start);
  image->SetRegions(region);
  image->Allocate();
  image->FillBuffer(0);

  itk::ImageRegionIterator<ImageType> imageIterator(image, image->GetLargestPossibleRegion());

  // Make two squares
  while (!imageIterator.IsAtEnd())
  {
    if ((imageIterator.GetIndex()[0] > 5 && imageIterator.GetIndex()[0] < 20) &&
        (imageIterator.GetIndex()[1] > 5 && imageIterator.GetIndex()[1] < 20))
    {
      imageIterator.Set(255);
    }

    if ((imageIterator.GetIndex()[0] > 50 && imageIterator.GetIndex()[0] < 70) &&
        (imageIterator.GetIndex()[1] > 50 && imageIterator.GetIndex()[1] < 70))
    {
      imageIterator.Set(255);
    }
    ++imageIterator;
  }

  itk::WriteImage(image, "input.png");
}
Classes demonstrated#
-
template<typename TLabelMap, typename TFeatureImage, typename TOutputImage = Image<RGBPixel<typename TFeatureImage::PixelType>, TFeatureImage::ImageDimension>>
class LabelMapOverlayImageFilter : public itk::LabelMapFilter<TLabelMap, TOutputImage> Apply a colormap to a label map and superimpose it on an image.
Apply a colormap to a label map and put it on top of the feature image. The feature image is typically the image from which the labeling was produced. Use the SetInput function to set the LabelMap, and the SetFeatureImage function to set the feature image.
The set of colors is a good selection of distinct colors. The opacity of the label map can be defined by the user. A background label produce a gray pixel with the same intensity than the input one.
This implementation was taken from the Insight Journal paper:
https://www.insight-journal.org/browse/publication/176- Author
Gaetan Lehmann. Biologie du Developpement et de la Reproduction, INRA de Jouy-en-Josas, France.
- See
LabelOverlayImageFilter, LabelOverlayFunctor
- See
LabelMapToRGBImageFilter, LabelMapToBinaryImageFilter, LabelMapToLabelImageFilter
- ITK Sphinx Examples:
